What is This Mod?
- This mod is a Custom Avatars mod for Beat Saber for the standalone version of Beat Saber.
- This mod utilizes the VRM Format to load in models.
- Sources for these models can be found This Section
The Performance Must be Awful!!
- The performance is actually pretty good and definitely playable. Depending on the avatar you can potentially see:
- Quest 2 can run 60-75fps with base settings
- Quest 3 can run 85-120fps with base settings
- These can be increased by toggling off other graphic settings and/or overclocking in anytweaks.
Support
- For support you can either send me a dm (futuremapper on discord, @Futuremapper_ on twitter)
- Or you can join the discord for the mod https://discord.gg/YKkCutTFE5
How to install the mod
- Download the mod from the source you found it from
- Install the mod through BMBF
- NOTE: This mod is very heavy(~100mb). Installation may take a minute so don't panic.
How to install VRM Files
- Find the VRMs you want to install
- Open up BMBF/QAVS in your headset
- Drag and drop the VRMs you want to install into the bmbf upload page
Where to Find VRMS
Booth.PM
- This is a very good spot to find VRMs as lots of them are very high quality. All of them can be downloaded, but many are not free. You can filter by max price to find free ones.
VRoid Hub
- This is a decent spot to find VRMs. Not all files here are downloadable, though the ones that are can be downloaded for free.
How to configure your avatar
The following subchapters can help you explore the different ways to configure your avatar.
IK
AKA. Inverse Kinematics
What is IK?
- IK describes the way that your avatar can move it's waist and elbows without knowing where they actually are.
Available options
- Leg Swivel: This is an important one! Adjusting this value can fix issues where some avatars may bend their legs to the side. This value changes the angle which the knees go when crouching for example.
- Arm Swivel: Similar to leg swivel but not as important. This value adjusts the angle that you elbows go in when bringing your arms towards your body.
- Body Stiffness: This value determines how stiff your torso will be. You can see how this value affects your avatar by leaning forwards and backwards with a low and high stiffness.
- Shoulder Rotation Weight: This value will lower the shoulders the higher the value.
- Ground Offset: This value is also very useful for avatars that are much taller than you. This allows you to offset where your avatar's feet are vertically.
Locomotion
What is Locomotion?
- Locomotion is the term used to describe how your avatar's legs move when no trackers are available. Allows your avatar to walk along with your headset.
Available options
- Foot Distance: This is the distance that will be roughly maintained between your feet.
- Step Threshold: This is the distance your head must move before either foot takes a step.
- Step Height: This is the height your feet will move up when taking a step.
- Step Offset: this is the offset your feet will have relative to your head.
Lighting
Available options
- Global Color: This is the color used in the menus or in-game without beatmap lighting.
- Light Intensity: This is the brightness intensity of the lights used in the menus or in-game without beatmap lighting.
- Light Rotation X: The vertical angle of the light (Everywhere).
- Light Rotation Y: The horizontal angle of the light (Everywhere).
- Beatmap Lighting: This setting enables lighting to be controlled by lighting effects ingame.
- Beatmap Lighting Brightness: How bright the beatmap lights should be.
- Beatmap Lighting Saturation: How saturated the colors should be for beatmap lights.
- Beatmap Lighting Minimum Brightness: The minimum brightness that the beatmap lights should be at any moment.
Recommended Settings
- For regular maps, I recommend a brightness of 0.7, saturation of 0.3, and a minimum brightness of 0.6
- For Lightshows, I recommend a brightness of 0.8, saturation of 0.7, and a minimum brightness of 0.3
Expressions
AKA. Blendshapes, Shapekeys, etc.
What are expressions?
- Expressions are movements made on your face. For example, blinking, smiling, anger, etc. This includes face tracking and lip syncing (Not yet released).
Available options
Basic
- Auto Blink: This makes the avatar automatically blink.
- Blink Wait Time: This is the amount of time to wait between blinks
- The actual wait time is calculated based on 1.5(seconds) + (Wait Time * 0.0-1.0(random value))
- Mock Eye Movement: This option makes the eyes look in different directions every 1-2 seconds, makes the avatar look more natural.
- Neutral Expression: This is the expression shown when no buttons/triggers are held down
Controller Triggers
- Each option here represents a button/trigger on your controller. The selected expression will activate when you press down this button/trigger.
Virtual Motion Capture
What could Virtual Motion Capture possibly be used for???
- This mod makes use of the Virtual Motion Capture Protocall to allow for FBT through SlimeVR or other methods that come up in the future.
- NOTE: FBT still needs more testing and tweaking. If you have a SlimeVR setup and are willing to help I can guide you through setting up. I do not have a kit for myself so it is hard for me to tell if it will look correct in game.
Sender
Available Options
- Enable Sender: This enables sending controller and headset positions over Wi-Fi through the VMC Protocall.
- Destination IP Address: This is the IP address you want to send VMC Protocall data to. This is typically the IP address of your pc or your quest itself if you run SlimeVR through Termux on the Quest.
- Destination Port: This is the port to send data through. Typically
3950. This is the same value as thePort Invalue in SlimeVR VMC settings.
Receiver
Available Options
- Enable Receiver: This enables receiving tracker/bone positions over Wi-Fi through the VMC Protocall.
- Receiver Port: This is the port you want to receive positions through. Typically
3949. Same value as thePort Outin SlimeVR VMC settings.
Full Body Tracking
Available Options
- Enable FBT: This enables Full Body Tracking (obv).
- Right Knee Tracker: Tracker used for the avatar's right knee.
- Left Knee Tracker: Tracker used for the avatar's left knee.
- Right Foot Tracker: Tracker used for the avatar's right foot.
- Left Foot Tracker: Tracker used for the avatar's left foot.
- Waist Tracker: Tracker used for the avatar's waist.
- Chest Tracker: Tracker used for the avatar's chest.
Wind
- Based off WindForVRM
Available options
- Enable Wind: This enables the wind effect for the avatar
- Wind Strength: How strong the wind should be.
- Wind Time Factor: Frequency of wind pushes.
Mirror
Available options
- Enable Mirror: Whether the mirror should show up or not.
- Size: Size of the mirror itself.
- Aspect: The aspect ratio of the mirror.
- 1.0 for square
- 1.77 for 16:9 (Desktop)
- 0.56 for 9:16 (Vertical Desktop/Tiktok format)
- Displayer layers: What objects should be reflected in the mirror.
- All
- All Except UI
- Only Avatar
- Avatar and Saber
- Avatar, Saber, and Notes
- Avatar, Saber, Notes, and Walls
- Tracked Bone: Part of the body that should be tracked by the mirror's camera.
- Disabled (Follow Mirror)
- Waist (Follows the Waist)
- Chest (Follows the Chest)
- Head (Follows the Head)
- Tracking Distance: Distance away the camera should be from the bone that is being tracked.
- Scene: Where the mirror should be displayed
- Both
- Menu
- Game
- FOV: Field of View of the mirror's camera.
- Near Clip: How close to the camera to stop showing objects.
- Border Color: Color of the border around the mirror.
- Transparent Background: Replaces the black part of the mirror with transparent
- Show Handle: Whether or not to show the handle on the mirror.
Finger Posing
Helpful Diagram
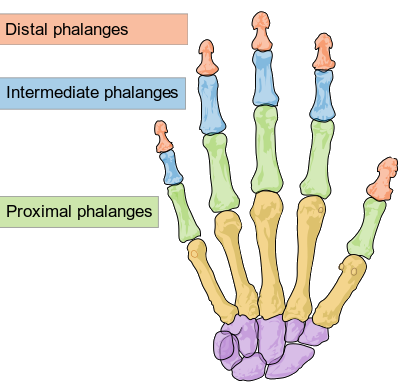
How do I Configure Finger Posing?
- Each subcategory contains a finger on the avatar's hand. Each one has 4 options.
- Distal: The last joint on your finger, your finger tips
- Intermediate: The middle joint on your finger.
- Proximal: The first joint on your finger.
- Proximal Horizontal Angle: The horizontal angle of the first joint of the finger, useful for making splayed hands.
Future Features
- Bind finger poses to different events (Buttons, Triggers, Scoring, etc...).